

Capturing screenshots on Windows is essential for everything from work presentations to sharing funny memes. If you’re wondering how to screenshot on Windows, this comprehensive guide covers the latest methods for Windows 11 and earlier versions as of 2025. We’ll explore built-in tools, keyboard shortcuts, and third-party options to help you take screenshots quickly and efficiently. Whether you’re using a laptop, desktop, or tablet, these steps will make screen capture a breeze.
1. Using the Snipping Tool (Recommended for Precision)
The Snipping Tool is the go-to method for most users in Windows 11, offering versatile options like rectangular, freeform, window, or full-screen snips. It also supports screen recording with Windows logo key + Shift + R.

- Quick Shortcut: Press Windows + Shift + S to open the snipping overlay. Select your snip type, drag to capture, and the screenshot copies to your clipboard. Paste it into an app like Paint or Word with Ctrl + V.
- Full App Mode: Search for “Snipping Tool” in the Start menu, open it, and click “New” to start capturing. You can edit, annotate, or save directly.
- Auto-Save Feature: Enable automatic saving in settings to avoid losing snips.
This tool is perfect for annotated screenshots and has been updated in 2025 for better performance.

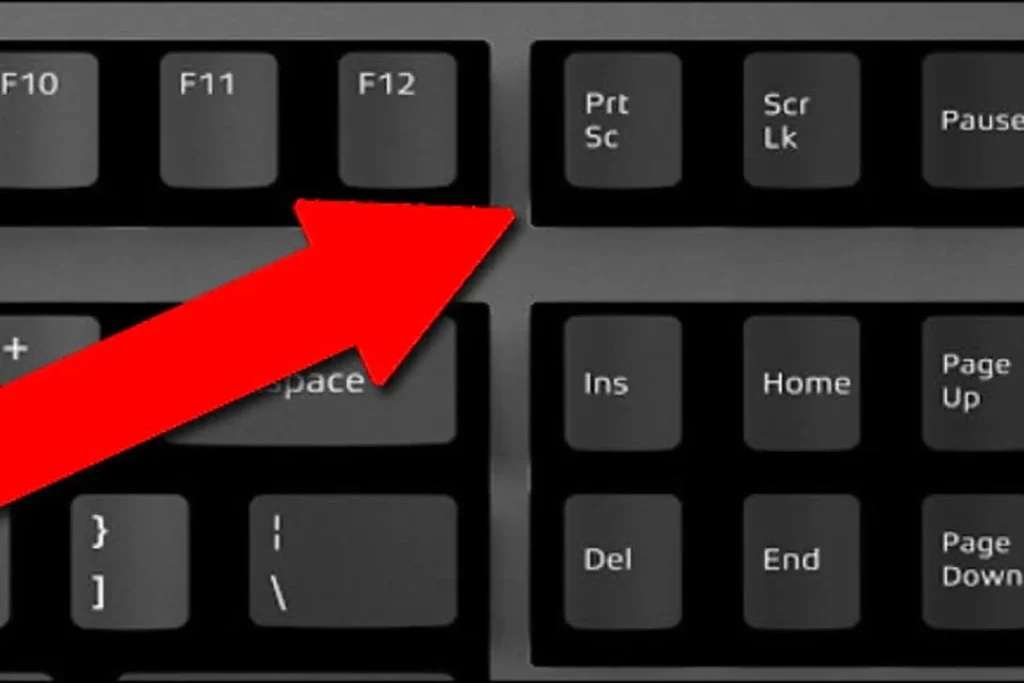
2. Keyboard Shortcuts with Print Screen (PrtScn)
For fast, no-frills captures, use the classic Print Screen key found on most keyboards.
- Full Screen to Clipboard: Press PrtScn to copy the entire screen. Open Paint, press Ctrl + V, and save as PNG or JPG.
- Active Window Only: Use Alt + PrtScn to capture just the focused window.
- Save Directly: Hit Windows + PrtScn – the screen dims briefly, and the screenshot saves automatically to Pictures > Screenshots folder.
- OneDrive Integration: Set up PrtScn to auto-save to OneDrive for cloud backups.
These shortcuts work across Windows versions, including 10 and 11, without needing extra software.
3. Capturing Screenshots with Xbox Game Bar
Ideal for gamers or full-screen apps, the Xbox Game Bar provides quick access to screenshots and recordings.
- Press Windows + G to open the overlay.
- Click the camera icon or use Windows + Alt + PrtScn to capture.
- Screenshots save to Videos > Captures folder.
This method is great for capturing gameplay or apps that block other tools, and it’s built-in with no setup required.
4. Third-Party Tools for Advanced Features
If built-in options aren’t enough, consider free tools like Lightshot, Greenshot, or ShareX for customizable hotkeys, editing, and uploads.
- Lightshot: Simple drag-to-select with instant sharing.
- Greenshot: Open-source with annotation and OCR features.
- ShareX: Advanced with screen recording and automation.
Download from official sites to avoid malware, and these work seamlessly on Windows 11 in 2025, according to CNET.
Tips and Troubleshooting for Better Screenshots
- Multi-Monitor Setup: Most tools capture the primary screen by default; use Snipping Tool for specific monitors.
- High-Resolution Displays: Ensure your display settings are optimized for clear captures.
- Can’t Find Screenshots? Check the Screenshots folder in Pictures or use File Explorer search.
- Updates in 2025: Windows 11’s Snipping Tool now includes better HDR support and microphone integration for recordings.
- Accessibility: For keyboard-only users, pin Snipping Tool to the taskbar for easy access.
Mastering how to screenshot on Windows saves time and boosts productivity. Experiment with these methods to find your favorite. If you’re on an older Windows version, most shortcuts still apply. For more tech tips, stay tuned!
More articles: