
Last Updated on 06/05/2026 by TinHN Editor
Do you prefer seeing time in 12-hour format (with AM/PM) or 24-hour format (military time) on your Windows taskbar? Many users want to customize the date and time display for better readability or to match their regional preferences. Fortunately, changing the time format in Windows is quick and straightforward.
In this guide, you’ll learn multiple easy methods to change the time format in Windows 11 and Windows 10, including short time, long time, and date formats. These steps also affect the taskbar clock, File Explorer, and other system elements.
Why Change the Time Format in Windows?
- Switch between 12-hour (AM/PM) and 24-hour clock.
- Customize date formats (e.g., DD/MM/YYYY vs. MM/DD/YYYY).
- Improve productivity for users who work with international teams or prefer military time.
How to change time format in Windows
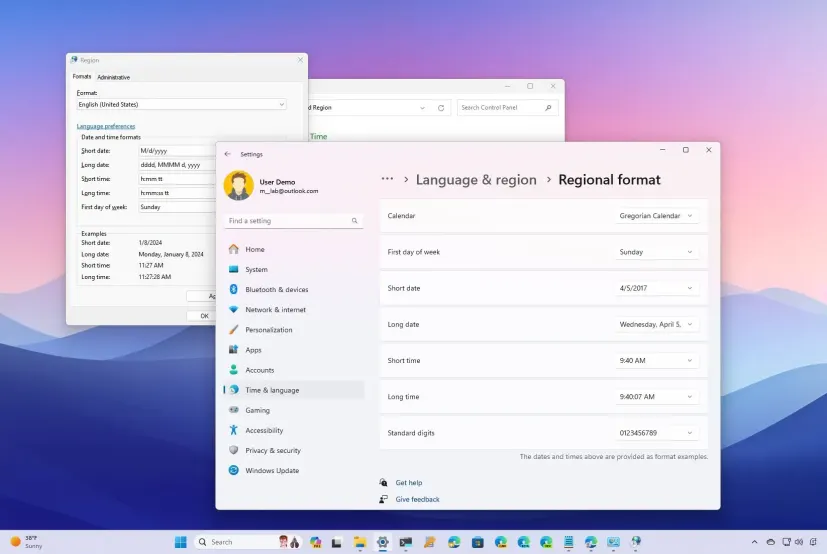
Method 1: Change Time Format Using Windows Settings
This is the simplest way in modern Windows versions.
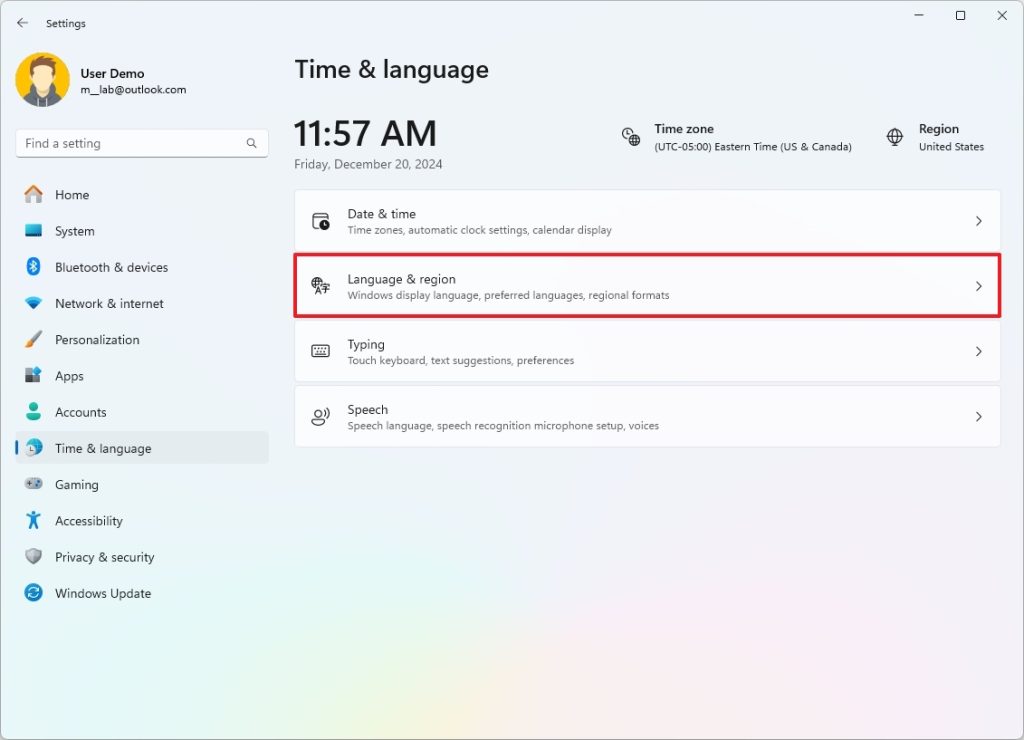
- Press Win + I to open the Settings app.
- Click on Time & language from the left sidebar.
- Select Language & region (or Region in some versions).
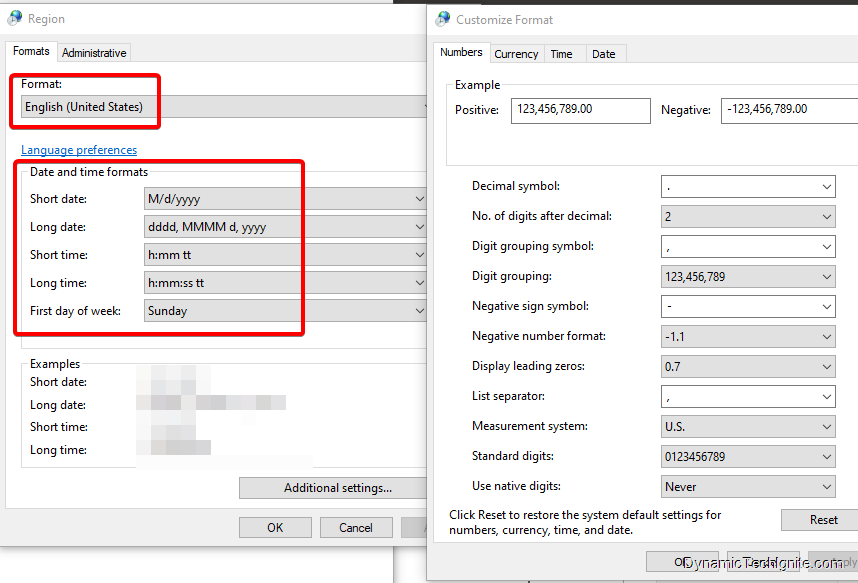
- Scroll down to the Regional format section and click Change formats.
- Now you can customize:
- Short time — Choose
h:mm ttfor 12-hour format (e.g., 2:30 PM) orHH:mmfor 24-hour format (e.g., 14:30). - Long time — Choose
h:mm:ss tt(12-hour with seconds) orHH:mm:ss(24-hour). - Short date and Long date for date display.
- The changes apply instantly. Check your taskbar clock to see the new format.
Tip: Use lowercase h for 12-hour and uppercase HH for 24-hour format.

Method 2: Change Time Format via Control Panel
If the Settings app doesn’t give enough flexibility, use the traditional Control Panel:
- Type Control Panel in the Windows search bar and open it.
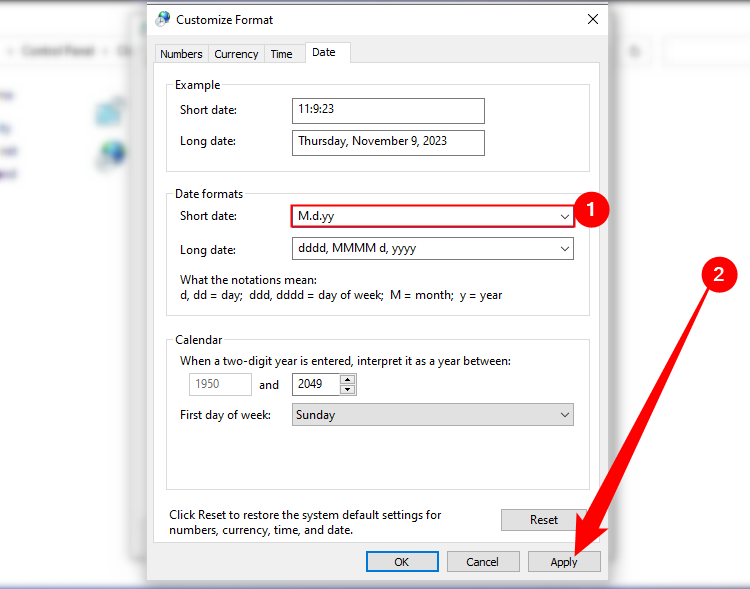
- Click Clock and Region > Region (or Change date, time, or number formats).
- In the Formats tab, click Additional settings.
- Go to the Time tab.
- Edit the following fields:
- Short time:
h:mm tt(12-hour) orHH:mm(24-hour) - Long time:
h:mm:ss ttorHH:mm:ss
- Click Apply > OK.
This method gives you full control and works reliably on both Windows 10 and Windows 11.
Method 3: Change Date and Time Format Using Registry Editor
For users who want complete customization or if the above methods don’t apply changes correctly:
- Press Win + R, type
regedit, and press Enter to open Registry Editor. - Navigate to this path:
HKEY_CURRENT_USER\Control Panel\International - Modify these string values (double-click to edit):
sShortTime→h:mm tt(12-hour) orHH:mm(24-hour)sTimeFormat→h:mm:ss ttorHH:mm:sssShortDateandsLongDatefor date formats (optional)
- Close Registry Editor and restart your computer for changes to take effect.
Warning: Always back up your registry before making changes.
Additional Tips
- After changing the format, the taskbar clock usually updates immediately. If not, restart File Explorer or sign out and sign back in.
- The lock screen clock often follows the same regional format settings.
- Changing the time format does not affect the actual system time or time zone — only the display style.
- To switch back, simply select the opposite format (e.g., from
HH:mmtoh:mm tt).
Common Time Format Examples
| Format Type | 12-Hour Example | 24-Hour Example |
|---|---|---|
| Short Time | 2:30 PM | 14:30 |
| Long Time | 2:30:45 PM | 14:30:45 |
| Short Date | 11/04/2026 | 11/04/2026 |
| Long Date | Saturday, April 11, 2026 | Saturday, 11 April 2026 |
Change time format in windows to show seconds
- Press Windows + I to open Settings.
- Click on Time & language from the left panel.
- Select Date & time.
- Ensure Show time and date in the System tray is turned On.
- Click on the Show time and date in the System tray section to expand it.
- Check the box for Show seconds in system tray clock (uses more power) to enable seconds display.
- Close Settings — the Taskbar clock will now show hours, minutes, and seconds.
Optional – Show Seconds in Notification Center Clock
- In Date & time settings, turn on Show time in Notification Center.
- Open the Notification Center to view the clock with seconds above the calendar.
Conclusion
Changing the time format in Windows is a simple customization that can make your daily workflow smoother. Whether you prefer the classic 12-hour clock with AM/PM or the clean 24-hour format, Windows gives you multiple ways to adjust it.
If you encounter any issues (for example, changes not applying), try the Control Panel method first, as it is often more reliable than the modern Settings app.
Have you successfully changed your time format? Let us know in the comments which method worked best for you!