

Taking a screenshot on Windows is one of the most essential skills for productivity, whether you’re capturing an error message, saving a memorable moment, creating tutorials, or sharing content quickly. Windows offers multiple built-in methods to screenshot your screen — from simple keyboard shortcuts to powerful tools like the Snipping Tool that support editing, annotations, and even screen recording.
In this comprehensive guide, you’ll learn every reliable way to take screenshots on Windows 11 and Windows 10, including the latest updates to the Snipping Tool. We’ll cover keyboard shortcuts, step-by-step instructions, where screenshots are saved, advanced tips, troubleshooting, and recommendations for third-party tools when you need more features.
Summary of Screenshot Methods on Windows
Here is a summary table of the main methods to take screenshots on Windows 11 and Windows 10 (updated for 2026):
| No. | Method / Shortcut | What It Captures | Where It Goes | Best For | Additional Notes |
|---|---|---|---|---|---|
| 1 | PrtSc (Print Screen) | Entire screen | Clipboard only | Quick full-screen copy | Paste with Ctrl + V into Paint or other apps |
| 2 | Windows + PrtSc | Entire screen | Automatically saved as PNG | Quick full-screen that needs saving | Saved in Pictures > Screenshots |
| 3 | Alt + PrtSc | Active window only | Clipboard only | Single app window | Paste with Ctrl + V |
| 4 | Windows + Shift + S (Recommended) | Rectangular, Freeform, Window, or Fullscreen | Clipboard + Notification to edit | Most flexible & precise captures | Opens Snipping Tool overlay instantly |
| 5 | Snipping Tool App | Rectangular, Freeform, Window, Fullscreen, Video | Opens editor for annotation & saving | Editing, annotating, text extraction, recording | Search “Snipping Tool” or use Win + Shift + S |
| 6 | Windows + Shift + R | Screen recording (video) | Opens Snipping Tool for editing/saving | Screen recordings with audio | Newer dedicated video shortcut |
| 7 | Windows + G (Xbox Game Bar) | Full screen or specific window | Saved in Videos > Captures | Gaming, full-screen apps, recordings | Also has Windows + Alt + PrtSc for quick screenshot |
| 8 | PrtSc key configured to open Snipping Tool | Depends on selection | Snipping Tool overlay | Users who prefer single-key access | Enable in Settings > Accessibility > Keyboard |
Quick Comparison & Recommendations
- Best everyday method: Windows + Shift + S — Fast, flexible, and gives immediate editing options.
- Best for full screen + auto save: Windows + PrtSc.
- Best for quick active window: Alt + PrtSc.
- Best for editing & annotations: Open the full Snipping Tool (supports pen, highlighter, shapes, text extraction, and screen recording).
- Best for video/screen recording: Windows + Shift + R or Game Bar.
Extra Tips
- On laptops without a dedicated PrtSc key, try Fn + Windows + Spacebar for full-screen auto-save.
- You can change the behavior of the PrtSc key in Settings > Accessibility > Keyboard to directly open the Snipping Tool.
- Screenshots are usually saved in PNG format (lossless quality).
- For scrolling/long-page captures, use Microsoft Edge’s built-in full-page screenshot or third-party tools like ShareX.

Why Learn Multiple Ways to Take Screenshot on Windows?
Different situations call for different screenshot methods:
- Quick full-screen capture for speed.
- Partial or window-specific snips for precision.
- Annotated or edited screenshots for presentations or support tickets.
- Scrolling captures for long webpages or documents.
- Screen recordings for tutorials or gameplay.
Windows has evolved significantly, especially in Windows 11, where the Snipping Tool has become the central hub combining features from the old Snip & Sketch app, with added capabilities like video recording and AI-powered enhancements on Copilot+ PCs.
1. Using Keyboard Shortcuts (Fastest Methods)
Print Screen (PrtSc) Key – Basic Full Screen Capture
- Press the PrtSc (or Print Screen) key on your keyboard.
- This captures the entire screen and copies it to your clipboard.
- Open an image editor like Paint, press Ctrl + V to paste, then save the file (PNG or JPG recommended).
Tip: On many laptops, you may need to press Fn + PrtSc if the key is shared with another function.
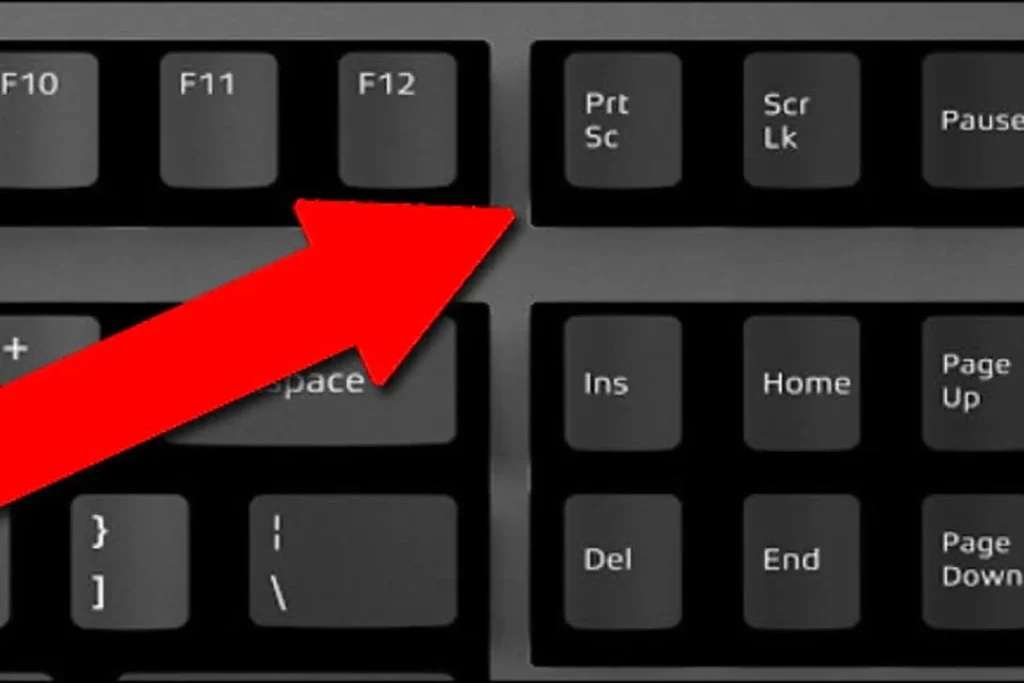
Windows Key + PrtSc – Auto-Save Full Screen
- Press Windows key + PrtSc.
- Your screen will dim briefly, indicating the capture.
- The screenshot is automatically saved as a PNG file in Pictures > Screenshots folder.
This is one of the most convenient methods for full-screen captures that you want saved instantly.
Alt + PrtSc – Active Window Only
- Press Alt + PrtSc to capture only the currently active window.
- The image goes to the clipboard — paste it into Paint or another app.
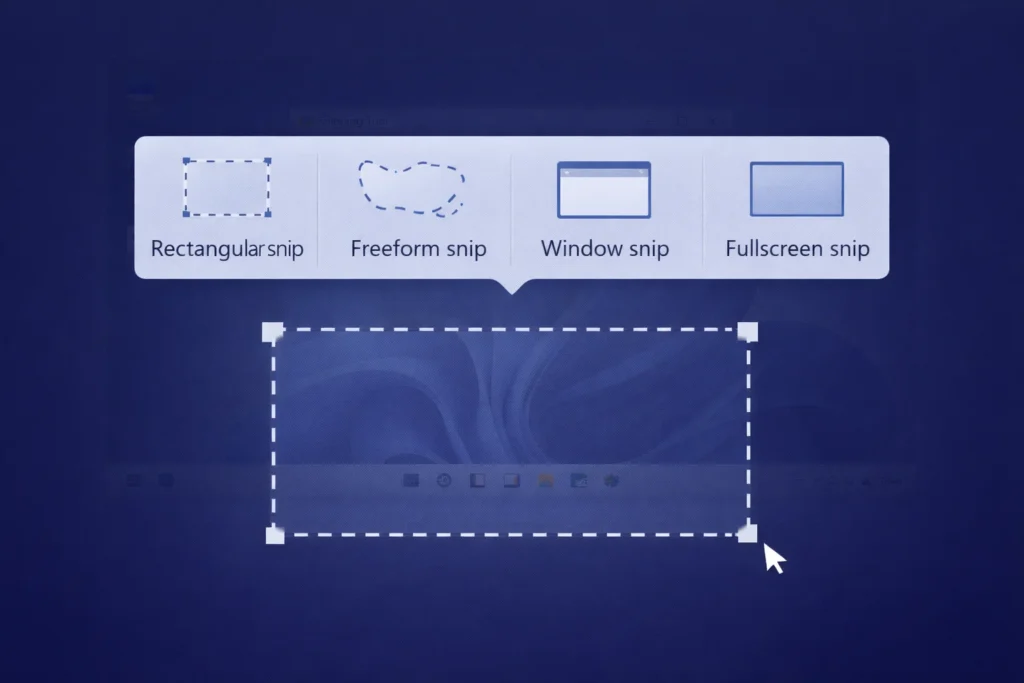
Windows Key + Shift + S – Modern Snipping Tool Overlay (Recommended)
This is the quickest and most versatile shortcut in Windows 11 and 10:
- Press Windows + Shift + S.
- Your screen will dim, and a small toolbar appears at the top with four modes:
- Rectangular Snip: Drag to select any area.
- Freeform Snip: Draw a custom shape.
- Window Snip: Click on any open window.
- Fullscreen Snip: Capture everything.
- After capturing, the screenshot is copied to the clipboard. A notification appears — click it to open the Snipping Tool for editing, annotating, or saving.

In recent Windows 11 updates, this shortcut opens the enhanced Snipping Tool directly.
Pro Tip: You can customize the PrtSc key behavior in Settings > Accessibility > Keyboard to open the Snipping Tool instead of just copying to clipboard.
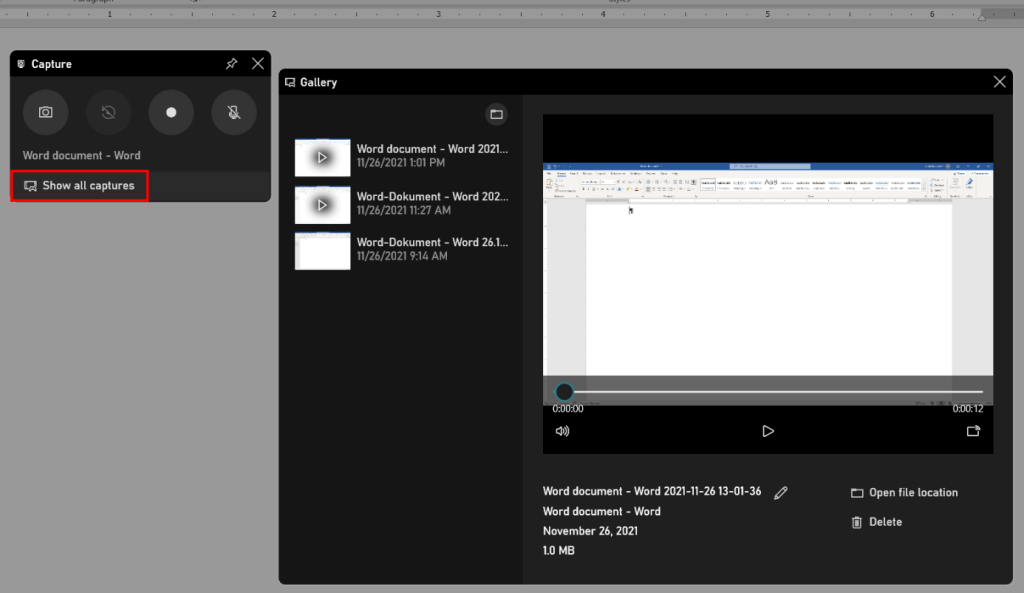
2. Using the Built-in Snipping Tool (Most Powerful Free Option)
The Snipping Tool is now the go-to app for screenshots on Windows. It supports multiple capture modes, delayed captures, annotations, text extraction, and screen recording.
How to Open the Snipping Tool
- Search for “Snipping Tool” in the Start menu.
- Or use the shortcut Windows + Shift + S for instant access.
Step-by-Step to Take a Screenshot
- Open the Snipping Tool.
- Click New (or the camera icon).
- Choose your mode from the toolbar: Rectangular, Freeform, Window, or Fullscreen.
- For delayed snips, click the dropdown next to “New” and select a delay (3 or 10 seconds).
- Capture your screen.
- In the editor:
- Draw with the pen tool.
- Highlight important areas.
- Add text or shapes.
- Use the eraser or crop tool.
- On newer versions, extract text from the image or use AI features like “Perfect Screenshot” on Copilot+ PCs.
Screen Recording with Snipping Tool
- Press Windows + Shift + R (newer shortcut for video).
- Or open the Snipping Tool, switch to the video/record mode.
- Select the area or window and start recording (with or without microphone/system audio).
- Stop recording and save the video (saved to Videos > Screen Recordings by default).
Recent updates have added features like text actions (copy or redact text), shapes, emojis, visual search with Bing, and color picker.

3. Using Xbox Game Bar for Screenshots and Recordings
Perfect for gamers or when capturing full-screen apps:
- Press Windows + G to open the Game Bar.
- Click the Capture widget (camera icon).
- Choose Screenshot (or the record button for video).
- Screenshots are saved in Videos > Captures.
Shortcut for quick screenshot: Windows + Alt + PrtSc.
4. Third-Party Tools for Advanced Features
If built-in options aren’t enough, consider free tools like Lightshot, Greenshot, or ShareX for customizable hotkeys, editing, and uploads.
- Lightshot: Simple drag-to-select with instant sharing.
- Greenshot: Open-source with annotation and OCR features.
- ShareX: Advanced with screen recording and automation.
Download from official sites to avoid malware, and these work seamlessly on Windows 11 in 2025, according to CNET.
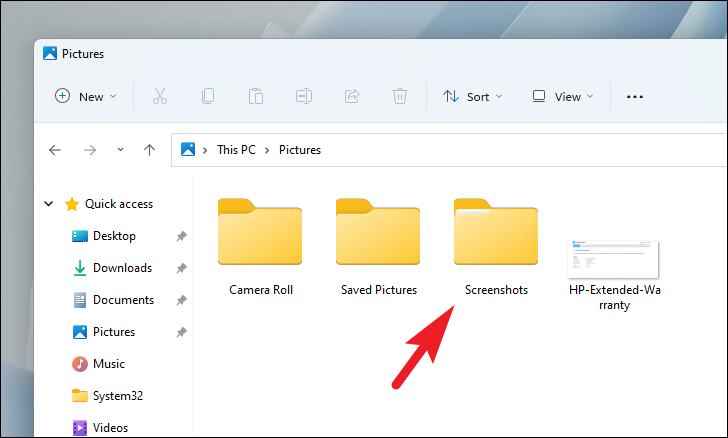
5. Where Are Screenshots Saved on Windows?
- Auto-saved screenshots (Windows + PrtSc): Pictures > Screenshots.
- Snipping Tool captures: Saved manually, or auto-saved if enabled in settings.
- Game Bar captures: Videos > Captures.
- Clipboard-only captures: Paste into any app before they disappear.
You can change the default save location or enable OneDrive backup for automatic cloud syncing.
6. How to Take Scrolling Screenshots on Windows
Standard tools don’t support scrolling natively for very long pages, but here are reliable workarounds:
- In Microsoft Edge:
- Go to the webpage.
- Press Ctrl + Shift + S (or three-dot menu > Screenshot).
- Select Capture full page.
- In Google Chrome:
- Open Developer Tools (Ctrl + Shift + I).
- Press Ctrl + Shift + P to open Command Menu.
- Type “screenshot” and choose Capture full size screenshot.
- Third-party free tools like ShareX offer excellent scrolling capture modes that automatically stitch long content.
7. Advanced Tips and Customization
- Delay Timer: Useful for capturing dropdown menus or tooltips (available in Snipping Tool).
- Edit in Paint: From Snipping Tool, choose “Edit with Paint” for more advanced editing.
- OneDrive Integration: Enable automatic saving of screenshots to OneDrive for easy sharing across devices.
- Copilot+ PC Features: On supported hardware, enjoy AI tools like “Perfect Screenshot” (auto-adjusts framing) and color picker.
- Keyboard Remapping: Use PowerToys (free from Microsoft) to create custom screenshot shortcuts.
8. Troubleshooting Common Screenshot Issues
- PrtSc key not working: Check if it’s disabled in Accessibility settings or conflicting with other software. Try Fn key on laptops.
- Screen doesn’t dim: Graphics driver issue — update your drivers.
- Snipping Tool missing: Update Windows or reinstall via Microsoft Store.
- Multi-monitor setups: Ensure you select the correct screen or use window-specific modes.
- No sound in recordings: Check microphone and system audio permissions.
Conclusion: Master Screenshotting on Windows Today
The easiest and most recommended way for most users is Windows + Shift + S combined with the Snipping Tool — it’s fast, flexible, and packed with modern features. For quick full-screen saves, Windows + PrtSc remains unbeatable.
Practice these methods a few times, and you’ll be able to capture anything on your Windows PC effortlessly. Whether you’re on Windows 10 or the latest Windows 11, these techniques work reliably.
Need to capture something specific? Start with the Snipping Tool shortcut today and explore the built-in editor for polished results.
Related Articles:
- How to Record Your Screen on Windows 11
- Best Free Screenshot Tools for Windows
Save this guide for future reference and boost your productivity! If you have questions about a specific method, feel free to ask in the comments.
More articles: